"Crafting Timeless Designs, One Stitch at a Time."

"Crafting Timeless Designs, One Stitch at a Time."

Wednesday, April 9, 2025

✂️ Sew a Reversible Hot/Cold Rice Bag: A Year-Round Comfort Project

"Blue floral reversible rice bag with cozy cream fabric background, designed for hot and cold comfort year-round."
“This cozy reversible rice bag is perfect for hot or cold relief, especially during the cold season. It's easy to sew and even easier to love!”


Whether it's a chilly winter night or a hot summer day, a handmade rice bag can provide the comfort you need. In this tutorial, I’ll show you how to sew a dual-purpose rice bag that can be microwaved for warmth or frozen for cooling. It's a simple, beginner-friendly sewing project—and a great homemade gift!


🧡 Supplies You’ll Need:


100% cotton fabric (avoid synthetic blends)

Matching thread

Uncooked rice, flaxseed, or dried corn (about 2–3 cups)

Scissors or rotary cutter

Ruler or measuring tape

Pins or clips

Funnel (optional, but helpful!)

Sewing machine

Iron

Freezer-safe plastic bag (for storing the bag when used cold)


✨ Optional:

Essential oils (like lavender) for a soothing scent

Removable cover for washing


πŸ“ Step 1: Cut the Fabric


Cut two rectangles of fabric:

Size suggestion: 10” x 6” (for a small bag) or 18” x 8” (for a full-size neck wrap)

You can adjust the size depending on the purpose — lap, neck, or hands.


πŸͺ‘ Step 2: Pin and Sew Three Sides


Place the two fabric pieces right sides together.

Pin or clip them in place.

Sew around three sides with a ½” seam allowance, leaving one short end open.

Backstitch at the beginning and end for strength.


πŸ”„ Step 3: Turn Right Side Out and Press


Turn the bag right side out.

Use a chopstick or pencil to gently push out the corners.

Press the seams flat with an iron for a clean finish.


🌾 Step 4: Fill the Bag


Use a funnel to pour in uncooked rice or other filler.

Fill the bag about 2/3 full — you want it to be flexible and not overly stuffed.

Optional: Add a few drops of essential oil for fragrance.


🧡 Step 5: Close the Opening


Fold the raw edges of the open end inward about ½”.

Pin and topstitch the opening closed close to the edge.

For extra strength, you can sew a double line of stitching.


πŸ’‘ Optional: Sew Internal Channels


To keep the filling evenly distributed, sew vertical or horizontal seams to create channels (like a quilted pillow).

Mark with chalk or a fabric pen and stitch carefully across the bag, taking care not to sew over the filler.


❄️ To Use as a Cold Pack:


Place your rice bag inside a plastic freezer bag to protect it from moisture.

Freeze for at least 1–2 hours before using.

Ideal for cooling down on hot days or soothing aches.


πŸ”₯ To Use as a Heat Pack:


Microwave for 1 to 2 minutes, depending on your microwave wattage.

Shake the bag to distribute the heat evenly before using.

Always check the temperature before applying it to your skin.


🧼 Care Tips:


Spot clean only (unless you’ve added a removable cover).

Store in a cool, dry place when not in use.


🧣 Enhance Your Rice Bag: Dual Covers for Every Season


Take your project to the next level by sewing your rice bag from sturdy 100% cotton or muslin and creating interchangeable seasonal covers!

Winter cover: Fleece or flannel with cozy novelty prints.

Summer cover: Lightweight 100% cotton in fresh, breathable prints.


Why It’s a Great Idea:


You can microwave or freeze the same rice bag all year long. (Unless you want to sew multiple rice bags.)

Removable covers are washable and customizable.

Seasonal covers make your handmade items more marketable and gift-worthy.


πŸ“Œ Marketing & Selling Tips:


Offer themed seasonal cover sets.

Personalize it with initials or fun fabric combinations.

Use lifestyle photos in your listings to show the bag used in different seasons.

Great for craft fairs or as thoughtful handmade gifts.


πŸ“₯ Download the Free Rice Bag Tutorial PDF Version!

Want to keep this tutorial handy or share it with friends?

πŸ‘‰ Click here to download the complete tutorial as a PDF

πŸ’¬ If you found this tutorial helpful, please share it with your sewing friends or pin it on Pinterest! Your support helps keep free projects like this coming.

Sunday, April 6, 2025

🧡 How to Choose the Right Sewing Pattern: A Smart Sewist's Guide

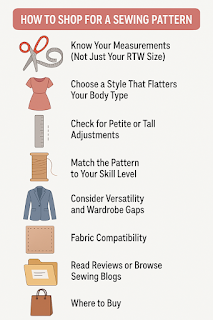
"Checklist graphic titled 'How to Shop for a Sewing Pattern' with icons and tips for choosing sewing patterns based on measurements, body type, and skill level."
Use this quick-reference checklist to shop smarter for sewing patterns that fit your body, flatter your shape, and match your sewing skill level.


Choosing the correct sewing pattern is a blend of inspiration, knowledge, and strategy. Whether you're a beginner or a seasoned maker, your success in sewing starts with selecting a pattern that matches your body, skill level, and wardrobe goals.


In this post, I’ll walk you through everything you need to know before clicking “Add to Cart” so you can choose your next sewing project with total confidence.


1. Know Your Measurements (Not Your Store Size!)

Sewing pattern sizes differ from those found in stores. You might wear a size 10 off the rack but need a size 14 in patterns. That’s why it’s essential to understand sewing pattern sizes before making a purchase.


Take accurate body measurements:

Bust

Waist

Hips

Back waist length

Then, compare those to the size chart on the sewing pattern envelope. If you’re between sizes, many patterns show how to blend them for a better fit.


A sewing pattern measurement chart with garment sizes and corresponding bust, waist, hip, and back waist length in inches.
Use this measurement chart to find your sewing pattern size based on bust, waist, hip, and back waist length—essential for a proper fit.


πŸ‘— 2. Choose a Style That Flatters Your Body Type


Part of choosing the best sewing pattern is finding styles that highlight your natural shape. Here’s an essential guide:

Pear-shaped: A-line skirts or detail on top to balance your silhouette

Apple-shaped: Empire waists and wrap dresses are flattering choices

Hourglass: Look for patterns that accentuate the waist with darts or belts

Rectangle: Try adding shape with gathers, flares, or ruffles

Want to learn how to read a sewing pattern to find the right fit? Check the line drawings on the back—they reveal how the garment is constructed and where it adds volume or shaping.


πŸ“ 3. Adjust Patterns for Petite or Tall Frames


Fit isn’t just about width—it’s also about length. Some patterns are labeled “Miss Petite” or “Tall”, but even if they’re not, you can often adjust the pattern using built-in lengthen/shorten lines.

This is crucial when you're learning how to fit sewing patterns to your body.


🧡 4. Choose Patterns That Match Your Skill Level


All sewing patterns come with a skill rating:

Beginner: Simple shapes, easy fabrics, few pieces

Intermediate: Darts, zippers, sleeves, and linings

Advanced: Tailoring techniques, delicate fabrics, and more shaping

If you’re just starting out, look for the best sewing patterns for beginners—these help you build confidence without frustration.


πŸ§₯ 5. Match the Pattern to Your Wardrobe & Lifestyle


Choose sewing patterns that work with your daily life. Ask yourself:

Will I wear this often?

Can I mix and match it?

Is it seasonally appropriate?

Look for wardrobe patterns or capsule wardrobe sewing patterns with multiple versions in one envelope—ideal for stretching your creativity and wardrobe.


🎨 6. Check the Recommended Fabrics


Always look at the recommended fabric list on the back of the pattern. It ensures the garment will drape and behave the way it’s designed to.

Lightweight woven fabrics for breezy garments

Knits for body-hugging styles

Structured fabrics like denim or linen for tailored pieces

Also, double-check yardage, notions, and pattern layout before shopping.


πŸ“ 7. Read Reviews and Research Before You Buy


Learning how to choose a sewing pattern becomes easier when you see what others have done with it. Use:


YouTube sew-alongs and tutorials

Instagram hashtags like #McCalls7845 or #ButterickPatterns

This helps you discover tips, fabric choices, and even common issues before you start cutting.


πŸ›️ 8. Where to Buy Sewing Patterns


Great sewing patterns are available from:

Craft stores like Michaels or Hobby Lobby

Indie pattern companies (Closet Core, Cashmerette, Tilly and the Buttons)

Etsy for downloadable PDFs

Bonanza, eBay, or Etsy for vintage & out-of-print patterns

🧑 Looking for doll clothes or vintage-style wardrobe patterns? Visit my The Needle Market shop


πŸ™‹‍♀️ FAQ: Choosing a Sewing Pattern


Q: How do I determine the correct sewing pattern size to purchase?

A: Use a measurement chart and compare your bust, waist, and hips to the size guide on the envelope. Don’t rely on your store size!

Q: What are the best sewing patterns for beginners?

A: Look for patterns labeled “Beginner.” These usually have fewer pieces, stable fabrics, and simple shapes—perfect for learning.

Q: How do I fit sewing patterns to my body?

A: Use size blending for adjustments to the bust, waist, and hips. Petite or tall? Look for patterns with lengthened or shortened lines to tweak bodice or skirt lengths.

Q: How do I read a sewing pattern?

A: The back of the envelope tells you the size chart, fabric suggestions, yardage, and required notions. Inside, you’ll find layout guides, construction steps, and tips.


Learning how to shop for a sewing pattern is part of the creative process. Once you master it, you'll avoid common mistakes and sew garments that actually fit your lifestyle and body.


Do you have a favorite go-to pattern or shopping tip? Share it in the comments—I’d love to hear what works for you!


The Closing Of The Designer's Needle To The Opening Of The Needle Market.

  The Closing Of The Designer's Needle To The Opening Of The Needle Market. I've Moved to a New Online Home: The Needle Market Dear ...