"Crafting Timeless Designs, One Stitch at a Time."

"Crafting Timeless Designs, One Stitch at a Time."

Wednesday, April 23, 2025

How I Transformed 18" Doll Clothes Patterns to Fit 11 1/2" Barbie

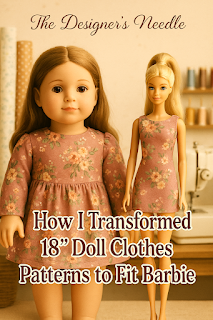
A Barbie doll and an 18-inch doll wearing matching floral dresses stand side by side in a cozy sewing room. The title "How I Transformed 18” Doll Clothes Patterns to Fit Barbie" is written in large text above them, branded for The Designer’s Needle blog.
From big to Barbie—see how I resized 18" doll clothes patterns to create one-of-a-kind Barbie fashions.


How I Put My Creativity To Work for 18-Inch Dolls and 11 1/2-Inch Barbies!


Where there’s a will, there’s a way—that’s always been my motto. One day, while browsing 18-inch doll clothes patterns, I was inspired: Why not transform them to fit Barbie? The basic principles were the same, and I already had the tools—just a printer, creativity, and my love for doll fashion. That’s how I began turning 18-inch doll clothes into one-of-a-kind outfits for 11.5" Barbie dolls, which worked beautifully. In this sewing tutorial, I’ll show you how I transformed 18-inch doll clothes patterns to fit an 11.5" Barbie—no special software needed!


Nearly two decades later, I’m still using this clever shortcut—and now I’m sharing it with you!


The Spark of the Idea


Eighteen years ago, I was sewing clothes for 18-inch dolls like American Girl. One day, I was curious, so I placed a doll clothes pattern on my printer bed and reduced the scale using the printer settings. After printing the pattern at a smaller size, I had my very first Barbie-sized version—and a whole new creative path opened up!


Resizing Tips That Worked for Me


Use your printer’s scale settings: Start with 60%–65 % for 11.5” Barbie proportions.

✂️ Test print a small piece first: Try the bodice front before committing to the complete set.

Adjust small details: Neckline depth, seam allowance, and armhole curves may need refinement.

Choose lighter materials: Lightweight cottons and tiny trims suit Barbie’s scale best.


Mixing and Matching for Style


Instead of just one pattern, I combined favorites: a skirt from one design, a top from another, and sleeves from a third. This mashup method gave me fresh, original Barbie clothes every time—and it was fun!


Selling Original Creations


As I perfected the resizing process, I began listing these outfits on selling platforms. Their handmade charm and creative flair made them stand out—and they sold!


Why This Idea Still Matters Today


Give new life to old or vintage patterns.

Avoid buying new Barbie patterns by reusing what you have.

Stretch your creativity with custom looks.

 Save time by adapting rather than drafting from scratch.


If you love sewing for dolls, try this creative shortcut. Reducing 18-inch doll patterns for Barbie isn’t just clever—it’s a doorway into endless miniature fashion possibilities.


Join the conversation:

Have you tried resizing doll clothes patterns? I’d love to hear about it in the comments. And don’t forget to click here to visit my The Needle Market Shop for more patterns, fabrics, and sewing inspiration.


Monday, April 21, 2025

✂️ How to Confidently Adjust a Sewing Pattern for the Perfect Fit


A flat-style digital illustration of a seamstress adjusting a paper sewing pattern on a dress form, surrounded by sewing tools like a measuring tape, scissors, and pins. The image represents customizing a pattern for fit.
Adjust your sewing patterns confidently using simple sewing tools and techniques to create garments that fit and flatter your body shape.


A companion to "How to Choose the Best Sewing Pattern for You"


You’ve chosen the perfect sewing pattern — it’s time to make it fit you perfectly. Whether you’re sewing a blouse, a dress, or a pair of pants, learning how to make minor adjustments to your pattern will help you sew clothes that look great and feel just right. In this guide, you’ll learn how to confidently adjust a sewing pattern for the perfect fit so you can wear your handmade garments with ease, style, and pride. 

Half the job of sewing a garment is adjusting and cutting the sewing pattern. This is the first step to sewing a perfect garment. Once you have made the pattern adjustments and cut the sewing pattern, the rest of your sewing project will be a breeze. 


Why Pattern Adjustments Matter


Most commercial sewing patterns are based on standard body measurements, but real bodies are beautifully unique. Pattern adjustments allow you to:


Improve comfort and movement
Flatter your specific body shape
Fix common fit issues (like gaping necklines or tight arms)
Turn a “close fit” into a “custom fit”


Understand Your Body’s Measurements


Before you adjust a pattern, you need accurate body measurements. Key measurements to take include:


Full bust
Waist
Hips
Back waist length
Shoulder width
Upper arm circumference

Use a flexible measuring tape and write everything down. Keeping a sewing journal with measurements is important for all your sewing projects. Also, keep notes on adjusting, cutting, and sewing your pattern in case you need to make adjustments or do not want to forget fine details that made your garment perfect.

Compare your numbers to the pattern’s size chart, and note where your measurements differ in your sewing journal.


✂️Basic Tools You’ll Need


Pattern paper or tracing paper
French curve or hip curve ruler
Measuring tape
Pencil and clear ruler
Scissors
Tape or pins (Pins can be used to stay your adjustments on pattern pieces instead of tape. You can reuse your pattern pieces and make new adjustments with pins. Once you use tape on paper pattern pieces, you cannot undo the adjustments using tape.)
Optional: dress form or muslin for testing


Standard Pattern Adjustments (And When to Use Them)


➤ Full Bust Adjustment (FBA)
This is perfect if your bust measurement is larger than the pattern size. It adds fullness and prevents pulling or gaping.

➤ Small Bust Adjustment (SBA)
For those who find too much ease in the bust area, this removes excess fabric while maintaining shape.

➤ Length Adjustments
Add or subtract length at the waist, hem, sleeve, or bodice to match your torso, arms, or legs. If you are petite or tall, adjusting your sewing pattern for length is critical. 

➤ Widen or Narrow the Hip
Adjust pants, skirts, or dresses to improve the fit at the hips using the slash-and-spread method or pivoting technique.

➤ Adjusting for Swayback
If you see pooling or bunching in the lower back, removing the length of the back waistline can fix it.

➤ Full Bicep Adjustment
Adds room to sleeves for a more comfortable fit in the upper arms.


How to Make the Adjustments Step-by-Step


1. Trace your original pattern onto a separate sheet of tracing paper, pellon, or pattern paper. 

2. Mark key adjustment lines (many patterns include these).

3. Slash, spread, or overlap as needed — use rulers to keep edges smooth.

4. Redraw seam lines using a French curve.

5. Add seam allowances if any were lost during cutting.

6. Label your changes for easy reference later.


Test the Fit First


Always make a muslin or toile before cutting your final fabric:

Use inexpensive cotton or a similar-weight fabric.

Sew with long basting stitches.

Try it on and mark any new fit changes.

This step saves you time, frustration, and fabric! (Make notes in your sewing journal of your sewing process for each sewing project.)


Making pattern adjustments may seem intimidating initially, but like all sewing skills, it gets easier the more you practice. And once you learn to tailor a pattern to your shape, you’ll wonder how you ever sewed without it!


You deserve garments that fit and flatter — and adjusting your patterns gives you that power. ✨

Are you looking for sewing patterns to sew your perfect garment? Click here to visit my The Needle Market Shop, where you can find an assortment of clothing and craft sewing patterns! I list new listings weekly or daily, so check often! 


The Closing Of The Designer's Needle To The Opening Of The Needle Market.

  The Closing Of The Designer's Needle To The Opening Of The Needle Market. I've Moved to a New Online Home: The Needle Market Dear ...