"Crafting Timeless Designs, One Stitch at a Time."

"Crafting Timeless Designs, One Stitch at a Time."

Thursday, May 8, 2025

Make a Sewing Keepsake: Stitching Your Life Into a Memory Quilt


A cozy flat lay of fabric squares, vintage scissors, thread spools, and a pincushion arranged on a patchwork quilt, with a card that reads “Make a Sewing Keepsake: Stitching Your Life Into a Memory Quilt.”

Capture your life in stitches—every fabric square tells a story in this heartfelt memory quilt. 


Transform beloved fabrics into a quilted tribute to the moments that matter most.


Some fabrics hold more than thread and fiber—they have memories. A baby’s first blanket, a favorite old shirt, Grandma’s apron, or fabric scraps from projects past can all be stitched together into a memory quilt. These keepsake quilts are more than cozy covers—they’re emotional time capsules. If you've ever wanted to turn your life’s story into stitches, here’s how to start.


🧵 What is a Memory Quilt?


A memory quilt is a handmade quilt created from fabric items that carry sentimental value. It's often made to commemorate loved ones, mark life events, or preserve your sewing journey. Each piece of fabric holds meaning, making the finished quilt deeply personal and unique.


🪡 Materials You Can Use:


Clothing (shirts, dresses, jeans, ties, uniforms)

Baby blankets or bibs

Wedding or prom dresses (yes, really!)

Fabric scraps from past sewing projects

Handkerchiefs, tea towels, or pillowcases (Even embroidered pieces)

Printed fabric photos (use printable fabric sheets!)

Old Clothing from the deceased.


✂️ Designing Your Quilt: Simple Tips


1. Choose a Theme or Mood:

Is it for a child, a memorial, a wedding gift, or your own story? Let that guide your color and block layout.

2. Stabilize Stretchy or Worn Fabrics:

Use lightweight fusible interfacing on T-shirts, knits, or worn fabrics to give them structure.

3. Keep the Layout Simple:

Use large squares or strips to let the fabric designs shine. Add sashing or borders if desired.

4. Add Personal Touches:

Hand-stitch names, dates, or quotes. You can even sew in pockets, buttons, or labels from the original garments.


💡 Optional Ideas to Personalize It:


Print family photos on fabric.

Add a quilt label with the story behind it.

Include a piece from every sewing project you’ve made in the past year.

Make a “journal quilt” with one block per month or milestone.


🧶 Why Memory Quilts Matter


Memory quilts provide comfort in more ways than one. They're a way to:

Honor loved ones

Preserve family history

Celebrate your sewing journey

Create a keepsake that lives on


Whether stitched from sorrow, love, joy, or hope, your memory quilt will become more than just a blanket—it becomes a story you can wrap around yourself. Start small, start with meaning, and let the memories guide your hands.

💬 Have you ever made a memory quilt or dreamt of it? Share your story in the comments.


Tuesday, May 6, 2025

Small Space Sewing Room Layouts That Work

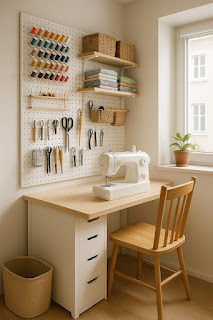
Compact sewing room layout with pegboard wall, small table, and natural lighting.


Stylish, Space-Saving Setups to Make Every Inch of Your Sewing Room Feel Like Home


If you’ve ever tried to sew in a small room, corner, or closet, you know the struggle is real. But the good news? You don’t need a large studio to create beautiful projects. Innovative layout ideas make even the tiniest sewing nook a creative haven.

Let’s explore sewing room layouts that maximize every inch, so you can sew comfortably without sacrificing function or style.


🧵 1. Wall-to-Wall Efficiency

Use every wall for vertical storage. Pegboards, open shelving, and mounted thread racks keep supplies off your workspace but within arm’s reach. A narrow table with drawers underneath offers both a sewing surface and storage.


🪡 2. Fold-Out Functionality

A fold-down wall desk or a gateleg table lets you tuck your sewing station away when unused. These are perfect for multipurpose rooms or small apartments!


🧺 3. Closet Conversion

A shallow closet can become a sewing closet (or “cloffice”) with a table inside and shelves above. Add a tension rod for hanging fabric or zippered project bags.


🧷 4. Under-the-Bed Storage

Store seasonal fabric or large yardage rolls under your bed in rolling bins or zippered totes. To reduce clutter, keep only your current project in your sewing space.


✂️ 5. Corner Nook Setup

Turn an unused corner into a functional sewing station. Create cutting and stitching zones with an L-shaped table or two small desks.


🪴 6. Mobile Sewing Cart

If you sew in shared spaces, use a rolling cart for your essentials. A three-tier cart holds notions, scissors, bobbins, threads, and rolls out of the way when you're done.


 Bonus Tips:

Choose compact machines and collapsible ironing boards.

Use curtain rods or tension rods to hang fabric or tools.

Add lighting—natural light is best, but task lamps work wonders.


You don’t need a big space—just a smart layout! Try one of these setups to transform your space into a cozy, creative corner.

Here is a PDF download for a DIY Portable Ironing Board you can create in any size. It is economical and can be stored easily in your sewing space! Enjoy!

Love sewing but short on space?

Grab my eBook Sewing On The Go — perfect for RVs, vans, and tiny homes!
You don’t have to give up your passion while traveling — just learn to sew smart with compact tips that work anywhere.

👉 Download it now and keep the creativity flowing no matter where you go!


The Closing Of The Designer's Needle To The Opening Of The Needle Market.

  The Closing Of The Designer's Needle To The Opening Of The Needle Market. I've Moved to a New Online Home: The Needle Market Dear ...